When the software is initially registered, you are given three, and ONLY three registrations. This allows for PC crashes and other unforeseen problems. Do not share your registration number with anyone else; this is yours and yours alone. You will need it for support and future reinstalls of the software. If you run out of registrations, you will have to pay the full price of a new copy in order to obtain a new registration number.
If you know that you are getting a new PC or laptop, there is a way to unregister the current installation so it may be installed onto the new PC without losing a registration count. For more details on registration, see the Registration help topic.
Initial registration pays for one year of upgrades and support. Your license must be renewed each year in order to continue using the software and to get support.
Main Screen Layout
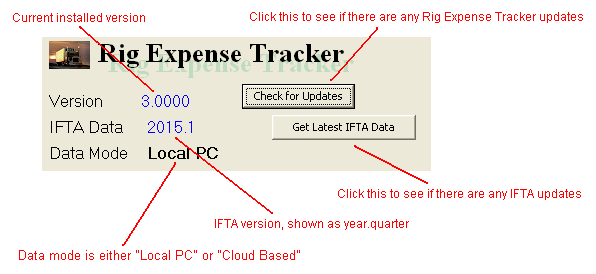
The main screen is not only the gateway to all of the functions in Rig Expense Tracker, but it also acts as the "About" screen. The version you are running is clearly displayed and you can check for updates to the software from here.
The top of the screen contains a pull-down menu, several buttons, and your current registration status. (Registration is explained here.)

Buttons
If you have more than one truck, then a set of numbered buttons (1, 2, 3, etc.) will appear to the right of the help button. These buttons will allow you to quickly switch between different trucks. The bold, green button number is the truck that is currently selected. Hovering the mouse over the button will tell you which truck it is, based on the information you provided.
Menu Selections
File - Backup / Restore Files. This will back up or restore your files.
File - Exit. This will close the current screen. If only the main screen open, the program itself will close.
Truck - Switch Trucks. This will allow you to switch between trucks. You may also press the F3 key. If you only have two trucks set up, switching between trucks will automatically go to the other truck without displaying a list of trucks.
Truck - Overall Truck Setup. This will take you to the overall truck setup screen. All trucks are set up here.
Truck - Maintenance Records. This will allow you to review your truck's maintenance records, and will create the monthly required DOT maintenance record report.
Truck - Trailer Maintenance. This will allow you to keep maintenance records for all of your trailers.
Truck - Upcoming Loads. This will allow you to enter potential loads for the future.
Tools - Company. This will take you to Company Information maintenance. Your overall name and address are entered here.
Tools - E-Mail Set Up. This will allow you to set up your POP3 e-mail settings, so that you can send reports via e-mail directly from Rig Expense Tracker.
Tools - Forms. This will allow you to print blank forms for daily input.
Tools - GPS Import. This will allow you to import GPS exported files (GPX) in order to automatically add state/province line changes and road changes into the Log File.
Tools - Load Charges Defaults. This will allow you to set up default charges that would be automatically added to each load.
Tools - Reminders Set Up. This will take you to the reminders maintenance screen.
Tools - Use Passive FTP. This will toggle FTP usage between passive mode and active mode. FTP is used to transfer data files between the program and the website. Passive FTP is the default. Select this menu entry to toggle between the modes. If a check mark is present on the menu entry, then passive mode is selected.
Tools - Cloud Control Panel. This will take you to the Cloud Control Panel. This is used to change the data access mode between local PC and cloud based.
Tools - Check Cloud Messages. You will only see this when in Cloud Based data mode. This will show you messages regarding the Cloud operation and scheduled maintenance.
Reports - Broker Report. This will take you to the Broker Report screen.
Reports - Log Report. This will take you to the Log File Report screen.
Reports - Loads With No Income. This will take you to the Loads With No Income Report screen.
Reports - IFTA Supporting Data. This will take you to the IFTA Supporting Data Report screen.
Reports - Summary Report. This will take you to the Summary Report screen.
Help - Help. Opens up help topics. You may also press the F1 key.
Help - Move Software to a Different PC. This will allow you to unregister the software so that it may be moved to a different PC.
Getting Updates
The next part of the main screen deals with the current version of the software and provides buttons to get updates. By default, the software will automatically look every 5 days for updates.
Applying program updates is always a 2-part process. The first part will update the program itself. Typically, you can always click the No-Questions-Asked Installation button. After the programs update, a "Convert Files to New Version" screen should come up. (If it does not appear, then please contact Support.) All you should have to do is to click the Convert Files button on that screen. The conversion program will tell you when it has completed.
Data Mode
By default, the software runs from your local PC. This means that all of your data files are located on your local hard drive and you are not sharing your data with anyone.
Alternatively, you may request to change your data mode to be "Cloud Based." This means that your data files will be kept on the Internet and you will be able to share your data with another PC that also has Rig Expense Tracker installed. Please read How Cloud Based Works for more information.
Truck Information and Statistics
The next part of the main screen shows you the current truck and that truck's fuel and cost statistics, based on what has been entered to-date in the log file.

On the fuel statistics, the "Avg. Cost per Gallon/Liter" represents the average price per gallon or liter for that truck. It is calculated by taking the sum of the total costs of each fuel stop and dividing by the sum of the fuel quantity. The "Avg. Price per Stop" is the sum of cost per gallon or liter for all stops divided by the number of stops. If your average cost per gallon is less than the average price per stop, then that means that you are putting in more fuel at those stations which have a lower price. The discounted figures reflect the lower price that some larger fleets get. All of the information in the fuel statistics are input in the log file fuel stops.
What to do First
1. Set up your overall name and address information from Tools - Company.
2. Register the software. See the Registration help topic for more details.
3. Set up your truck(s) from Truck - Overall Truck Setup.
4. Set up your e-mail information from Tools - E-Mail Setup.
Once these tasks have been accomplished, you are ready to begin logging your data.